

Many types of analyses benefit from running the COMSOL Multiphysics® software on high-performance computing (HPC) hardware. This is one of the main reasons behind the Cluster Computing node, which helps seamlessly integrate the COMSOL® software with any kind of HPC infrastructure, while maintaining the convenience of a graphical user interface. In this blog post, learn how to run large simulations remotely on HPC hardware directly from the COMSOL Desktop® graphical environment.
What Is Cluster Computing?
The most common type of HPC hardware is a cluster; a bunch of individual computers (often called nodes) connected by a network. Even if there is only one dedicated simulation machine, you can think of it as a one-node cluster.
The COMSOL Reference Manual also calls a single COMSOL Multiphysics process a node. The difference is rarely important, but when it does matter, we will call a computer a physical node or host and an instance of the COMSOL Multiphysics program a compute node or process.
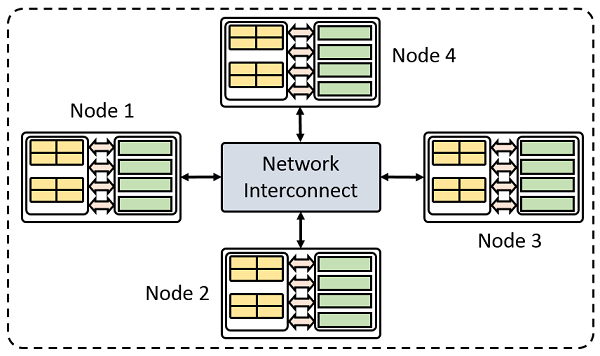
An example of a cluster with four compute nodes.
The work that we want to perform on the cluster is bundled into atomic units, called jobs, that are submitted to the cluster. A job in this context is a study being run with COMSOL Multiphysics.
When you submit a job to a cluster, the cluster does two things:
- Decides which nodes run which jobs and at what time
- Restricts the access to the nodes, so multiple jobs do not interfere with each other
These tasks are performed by special programs called schedulers and resource managers, respectively. Here, we use the term scheduler interchangeably for both terms, since most programs perform both tasks at once, anyway.
Note that it is possible to submit COMSOL Multiphysics jobs to a cluster using the comsol batch command (on the Linux® operating system) or comsolbatch.exe (on the Windows® operating system) in a script that you submit to the cluster. You might prefer this method if you’re already familiar with console-based access to your cluster. For additional information, please see the COMSOL Knowledge Base article “Running COMSOL® in parallel on clusters“.
In the following sections, we will discuss using the Cluster Computing node to submit and monitor cluster jobs from the COMSOL Desktop® graphical interface.
Adding the Cluster Computing Node to a Simple Model
Whenever I want to configure the Cluster Computing node for a cluster that I am not familiar with yet, I like to start with a simple busbar model. This model solves in a few seconds and is available with any license, which makes testing the cluster computing functionality very easy.
To run the busbar model on a cluster, we add the Cluster Computing node to the main study. We might need to enable Advanced Study Options first, though. To do so, we activate the option in Preferences or click the Show button in the Model Builder toolbar.
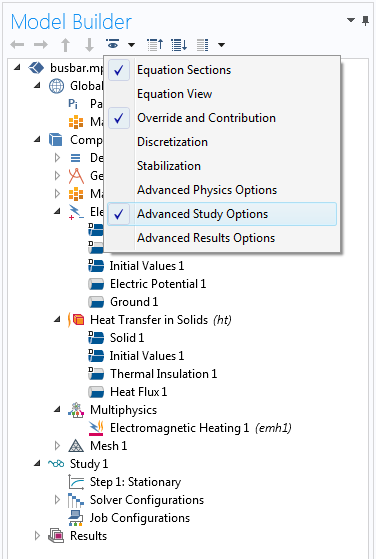
Activate Advanced Study Options to enable the Cluster Computing node.
Now the Cluster Computing node can be added to any study by right-clicking the study and selecting Cluster Computing.
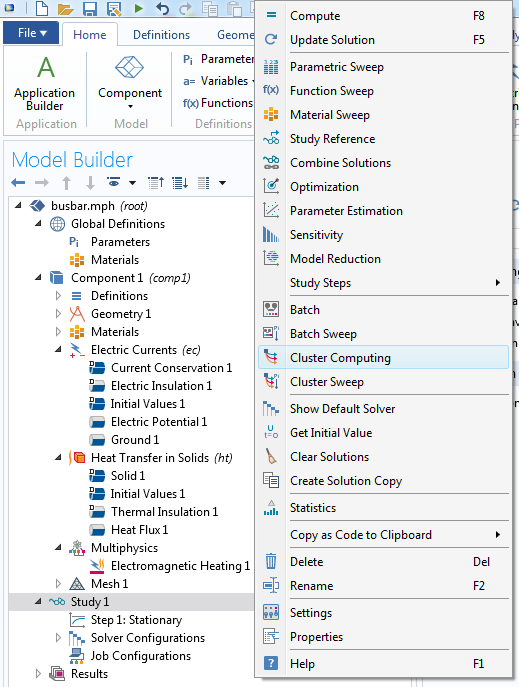
Right-click a study node and select Cluster Computing from the menu to add it to the model.

The default settings for the Cluster Computing node.
If you can’t find the Cluster Computing node, chances are your license is not cluster enabled (such as CPU licenses and academic class kit licenses). In this case, you can contact your sales representative to discuss licensing options.
Settings for the Cluster Computing Node
The most complex part of using the Cluster Computing node is finding the right settings and using it for the first time. Once the node works on your cluster for one model, it is very straightforward to adjust the settings slightly for other simulations.
To store the settings as defaults, you can change the settings under Preferences in the sections Multicore and Cluster Computing and Remote Computing. Alternatively, you can apply the default settings to the Cluster Computing node directly and click the Save icon at the top of the Settings window. It is highly recommended to store the settings as default settings either way, so you do not have to type everything again for the next model.
Discussing all of the possible settings for the Cluster Computing node is out of scope of this blog post, so we will focus on a typical setup. The COMSOL Multiphysics Reference Manual contains additional information. In this blog post, the following is assumed:
- COMSOL Multiphysics® is running on a local Windows® machine and we want to submit jobs to a remote cluster
- The cluster is running on Linux® and has SLURM® software installed as the scheduler
These settings are shown in this screenshot:
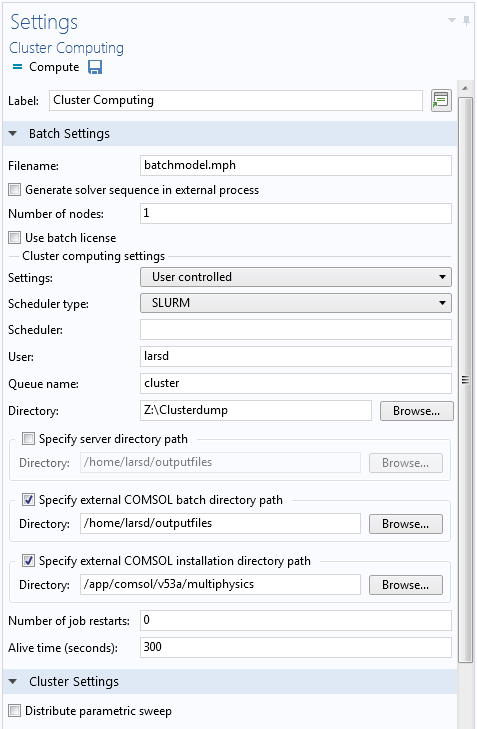
First, let’s talk about the section labeled Cluster computing settings. Since our cluster uses SLURM® software as its scheduler, we set the Scheduler type to “SLURM”. The following options are SLURM®-specific:
- Scheduler is left empty to instruct SLURM® software to just use the one scheduler that is available
- User is our username, which can be left empty to use the username we log in with on the cluster
- Queue name is the name of the queue to which the job is submitted
On the machine used in this example, we have two queues: “cluster” for jobs of up to 10 physical compute nodes with 64 GB of RAM each and “fatnode” for a single node with 256 GB. Every cluster will have different queues, so ask your cluster administrator what queues to use.
The next field is labeled “Directory”. This is where the solved COMSOL Multiphysics files go on a local computer when the job is finished. This is also where the COMSOL® software will store any intermediate, status, and log files.
The next three fields specify locations on the cluster. Notice that Directory was a Windows® path (since we are working on a Windows® computer here), but these are Linux® paths (since our cluster uses Linux®). Make sure that the kind of path matches the operating system on the local and remote side!
The Server Directory specifies where files should be stored when using cluster computing from a COMSOL Multiphysics session in client-server mode. When executing cluster computing from a local machine, this setting is not used, so we leave it blank. We do need the external COMSOL batch directory, however. This is where model files, status files, and log files should be kept on the cluster during the simulation. For these paths, be sure to choose a directory that already exists where you have write permissions; for example, some place in your home directory. (See this previous blog post on using client-server mode for more details.)
The COMSOL installation directory is self-explanatory and should contain the folders bin, applications, and so on. This is usually something like “/usr/local/comsol/v53a/multiphysics/” by default, but it obviously depends on where COMSOL Multiphysics is installed on the cluster.
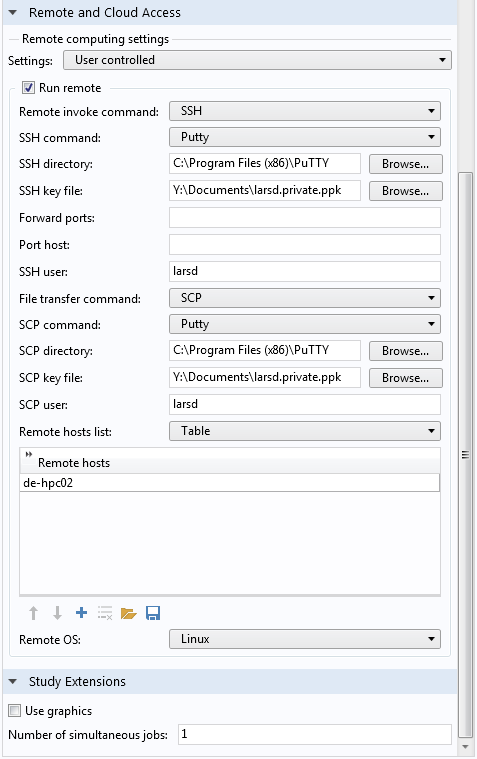
Remote connection settings.
The next important section is the Remote and Cloud Access tab. This is where we specify how to establish the connection between the local computer and remote cluster.
To connect from a Windows® workstation to a Linux® cluster, we need the third-party program PuTTY to act as the SSH client for the COMSOL® software. Make sure to have PuTTY installed and that you can connect to your cluster with it. Also, make sure that you set up password-free authentication with a public-private key pair. There are many tutorials online on how to do this and your cluster administrator can help you. When this is done, enter the installation directory of PuTTY as the SSH directory and your private key file from the password-free authentication in the SSH key file. Set the SSH user to your login name on the cluster.
While SSH is used to log in to the cluster and run commands, SCP is used for file transfer, for example, when transferring model files to or from the cluster. PuTTY uses the same settings for SCP and SSH, so just copy the settings from SSH.
Lastly, enter the address of the cluster under Remote hosts. This may be a host name or an IP address. Remember to also set the Remote OS to the correct operating system on the cluster.
When you are done, you can click the Save icon at the top of the Settings window to start with these settings next time you want to run a remote cluster job.
Another possibility to test whether your cluster settings work is to use the Cluster Setup Validation app, available as of COMSOL Multiphysics version 5.3a.
Running a Study on a Cluster
The settings that change every time you run a study include the model name and the number of physical nodes to use. When you click to run the study, COMSOL Multiphysics begins the process of submitting the job to the cluster. The first step is invisible and involves running SCP to copy the model file to the cluster. The second step is starting the simulation by submitting a job to the scheduler. Once this stage starts, the External Process window automatically appears and informs you of the progress of your simulation on the cluster. During this stage, the COMSOL Desktop® is locked and the software is busy tracking the remote job.


Tracking the progress of the remote job in the External Process window from scheduling the job (top) to Done (bottom).
This process is very similar to how the Batch Sweep node works. In fact, you may recognize the External Process window from using the batch sweep functionality. Just like when using a batch sweep, we can regain control of the GUI by clicking the Detach Job button below the External Process window, to detach the GUI from the remote job. We can later reattach to the same job by clicking the Attach job button, which replaces the Detach job button when we are detached.
Normally, running COMSOL Multiphysics on two machines simultaneously requires two license seats, but you can check the Use batch license option to detach from a remote job and keep editing locally with only one license seat. In fact, you can even submit multiple jobs to the cluster and run them simultaneously, as long as both jobs are just variations of the same model file; i.e., they only differ in their global parameter values. The only restriction is that your local username needs to be identical to the username on the remote cluster so the license manager can tell that the same person is using both licenses. Otherwise, an extra license seat will be consumed, even when the Use batch license option is enabled.
As soon as the simulation is done, you are prompted to open the resulting file:
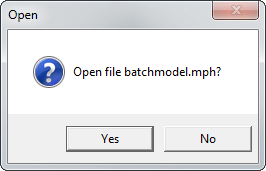
Once the cluster job has finished, you are prompted to immediately open the solved file.
If you select No, you can still open the file later, because it will have already been downloaded and copied to the directory that was specified in the settings. Let’s have a look at these files:
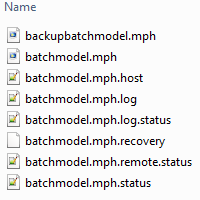
Files created during the cluster job on the local side.
These files are created and updated as the simulation progresses. COMSOL Multiphysics periodically retrieves each file from the remote cluster to update the status in the Progress window and informs you as soon as the simulation is done. The same files are also present on the remote side:
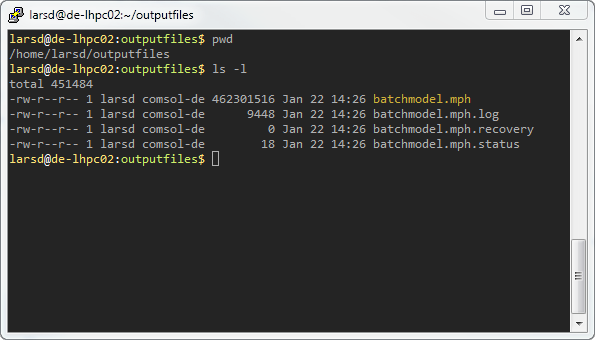
Files created during the cluster job on the remote side. Note: Colors have been changed from the default color scheme in PuTTY to emphasize MPH-files.
Here is a rundown of the most relevant file types:
| File | Remote Side | Local Side |
|---|---|---|
| backup*.mph | N/A |
|
| * .mph |
|
|
| *.mph.log |
|
|
| *.mph.recovery |
|
|
| *.mph.status |
|
|
| *.mph.host | N/A |
|
Using Cluster Computing Functionality for Your COMSOL Multiphysics® Simulations
The busbar model, being so small, is not something that we would want to realistically run on a cluster. After using that example to test the functionality, we can open up any model file, add the Cluster Computing node (populated with the defaults we set before), change the number of nodes and filename, and click Compute. The Run remote options, scheduler type, and all of the associated settings don’t need to be changed again.
What does the COMSOL® software do when we run a model on multiple hosts? How is the work split up? Most algorithms in the software are parallelized, meaning the COMSOL Multiphysics processes on all hosts work together on the same computation. Distributing the work over multiple computers provides more computing resources and can increase performance for many problems.
However, it should be noted that the required communication between cluster nodes can produce a performance bottleneck. How fast the model will solve depends a lot on the model itself, the solver configuration, the quality of the network, and many other factors. You can find more information in this blog series on hybrid modeling.
Another reason to use the hardware power of a cluster is that the total memory that a simulation needs stays approximately constant, but there is more memory among all of the hosts, so the memory needed per host goes down. This allows us to run really large models that would not otherwise be possible to solve on a single computer. In practice, the total memory consumption of the problem goes up slightly, since the COMSOL Multiphysics processes need to track their own data as well as the data they receive from each other (usually much less). Also, the exact amount of memory a process will need is often not predictable, so adding more processes can increase the risk that a single physical node will run out of memory and abort the simulation.
A much easier case is running a distributed parametric sweep. We can speed up the computation by using multiple COMSOL Multiphysics processes and having each work on a different parameter value. We call this type of problem “embarrassingly parallel”, since the nodes do not need to exchange information across the network at all while solving. In this case, if the number of physical nodes is doubled, then ideally the simulation time will be cut in half. The actual speedup is typically not quite this good, as it takes some time to send the model to each node and additional time to copy the results back.
To run a distributed parametric sweep, we need to activate the Distribute parametric sweep option at the bottom of the settings for the parametric sweep. Otherwise, the simulation will run one parameter at a time using all of the cluster nodes, with the parallelization performed on the level of the solver, which is much less efficient.
If you run an auxiliary sweep, you can also check the Distribute parametric solver option in the study step, for example, to run a frequency sweep over many frequencies in parallel using multiple processes on potentially many physical nodes. Note that if you use a continuation method, or if individual simulations depend on each other, then this method of distributing the parameters does not work.
Note: Do not use the Distribute parametric sweep option in the Cluster Computing node itself, as it has been depreciated. It is better to specify this at the parametric sweep directly.

Activate the Distribute parametric sweep option to run each set of parameters on a different node in parallel.
To run a sweep in parallel, we can also use the Cluster Sweep node, which combines the features of the Batch Sweep node with the ability of the Cluster Computing node to run jobs remotely. You can say that a cluster sweep is the remote version of the batch sweep, just like the Cluster Computing node is the remote version of the Batch node. We will discuss cluster sweeps in more detail in a future blog post.
The most important difference to remember is that the Cluster Computing node submits one job for the entire study (even if it contains a sweep), while the Cluster Sweep and Batch Sweep nodes create one job for each set of parameter values.
Cluster Computing with Apps
All of what is covered in this blog post is also available from simulation apps that are run from either COMSOL Multiphysics or COMSOL Server™. An app simply inherits the cluster settings from the model on which it is based.
When running apps from COMSOL Server™, you get access to cluster preferences in the administration web page of COMSOL Server™. You can let your app use these preferences to have the cluster settings hardwired and customized for a particular app. If you wish, you can design your apps so that the user of the app gets access to one or more of the low-level cluster settings. For example, in your app’s user interface, you can design a menu or list where users can select between different queues, such as the “cluster” or “fatnode” options mentioned earlier.
Concluding Thoughts
Whether you are using a university cluster, a virtual cloud environment, or your own hardware, the Cluster Computing node enables you to easily run your simulations remotely. You don’t usually need an expensive setup for this purpose. In fact, sometimes all you need is a Beowulf cluster for running parametric sweeps while you take care of other tasks locally.
Cluster computing is a powerful tool to speed up your simulations, study detailed and realistic devices, and ultimately help you with your research and development goals.
SLURM is a registered trademark of SchedMD LLC.
Linux is a registered trademark of Linus Torvalds in the U.S. and other countries.
Microsoft and Windows are either registered trademarks or trademarks of Microsoft Corporation in the United States and/or other countries.


Comments (15)
Sai Sanjit Ganti
May 10, 2018Hi,
Thank you for such an awesome post. I had been looking for this information recently and this proved very useful. I just have one question. You mentioned about distributing parametric sweep in the post. Does the ‘distribute parametric sweep’ button be activated in addition to setting up the cluster computing node, if I wish to run it on a cluster?
Recently, I had been trying to run the parametric sweep in parallel, by activating the ‘distribute parametric sweep’ button, but without actually setting up the cluster computing node. I used the commands from the blog post (https://www.comsol.com/support/knowledgebase/1001/) on running parallel jobs to submit the job to cluster. I used 3 nodes to solve the problem. After the job is finished, I find that results from the first node were as expected, but the results from the other two nodes were just erroneous. Could this have happened because of not setting up the cluster computing node?
Thank you in advance for any help or suggestion.
Regards,
Sai Sanjit Ganti
Caty Fairclough
June 25, 2018Hi Sai,
Thank you for your comment! In response to your first question, if you want to run a distributed parametric sweep, the preferred way is to enable it in the Parametric Sweep node. If you are using the command line, you do not have to set up a Cluster Computing node.
As for your second question, you may find this entry helpful: https://www.comsol.com/support/knowledgebase/1249/
For more details, feel free to contact our Support team.
Online Support Center: https://www.comsol.com/support
Email: support@comsol.com
Garima Varshney
May 16, 2022Hello Sai Sanjit Ganti,
I am also trying to run my job on cluster through desktop using console-based access. But unable to do so can you pls brief a little about it.
Thanks in advance.
Muhammad Gulzari
October 19, 2018Hi,
Thank you for very informative post. I followed your instruction and setup cluster computation. My simulation is not going further from Scheduling status and in log file the error is “Error : Cluster components are missing from the installation” . Can you tell me the solution.
Thanks
Regards,
M.Gulzari
Lars Drögemüller
October 22, 2018Hi Muhammad,
Thank you for your feedback. You need to make sure that you check “Cluster Components” during the installation of COMSOL Multiphysics, otherwise this error will appear. You can run the Setup program from the installation directory of COMSOL Multiphysics and then select “Add/Remove Products and Reinstall” to add the Cluster Components to an existing installation. Feel free to contact us at support@comsol.com if you would like further assistance.
Best regards,
Lars
Craig Jeffrey
November 5, 2018In 5.4, I am finding that sometimes when I trigger Compute in the Cluster Computing, I get a “Failed to save model. The file ‘batchmodel-slurm-2.mph’ is locked by another model” which I don’t understand as the remote sim is not running.
Stephen Lars
May 30, 2019I followed the instructions, I see in the remote cluster the files transfered but the status is always “submitting”. What could be wrong?
In batch module I see that the commands executed are (I see “,” after each coomand/option, is that right?)
C:\Program Files (x86)\PuTTY\plink, -batch, -i, C:\Users\sl\Desktop\puttyprivatekey.ppk, {remotehost}, sbatch, -N, 1, –ntasks-per-node=1, –export=FLROOT=C:\Program Files\COMSOL\COMSOL52a\Multiphysics, –share, -D, C:\Program Files\COMSOL\COMSOL52a\Multiphysics/bin, -o, C:\Users\sl\Desktop\Cluster\test.mph.log, -e, C:\Users\sl\Desktop\Cluster\test.mph.log, –partition=all, –mem=16384, –uid=stephen2, C:\Program Files\COMSOL\COMSOL52a\Multiphysics/bin/comsol, batch, -mpibootstrap, slurm, -job, b1, -alivetime, 15, -prefermph, -inputfile, “/home/stephen2/test.mph”, -batchlog, “/home/stephen2/test.mph.log”
Lars Drögemüller
June 5, 2019Hi Stephen, thank you for the comment! If the job does not progress from “Submitting” to “Running”, it indicates that the scheduler is not starting the job correctly. This could indeed be due to your submission command being a bit odd. It looks like it is trying to start a SLURM job, but on a Windows target computer. Did you set the “Remote OS” in the “Remote and Cloud Access” settings to “Linux”? Perhaps this or some other settings is preventing the job from starting. If the problem persists, please contact support@comsol.com . Thanks!
Napoleon
February 20, 2020Hi,
I find this blog very useful. However, I am trying to run COMSOL on a cluster, rather than on a remote desktop. What are the exact arrangements?
I have used the command line as describes in the blog, but it seems to not work well. Could you please help me? Cheers!
Best regards,
Napo
Lars Dammann
February 21, 2020 COMSOL EmployeeHi Napoleon, thank you for the comment! This blog post is about how to configure the COMSOL Desktop application to submit your models to a Linux cluster. In the background, the model is transmitted via SCP and COMSOL logs into the cluster via SSH and executes the shell command necessary to submit the simulation job to the scheduler SLURM. This is just an example and the system is very versatile and can be adapted to different configurations. There is also this knowlegebase article, which you may find useful: https://www.comsol.com/support/knowledgebase/1001 If you have more detailed questions, please send me a message to support@comsol.com and I will look into it.
Best regards,
Lars
Barnabas Adeyemi
June 5, 2020Hello,
Thank you so much for this blog post, it is super helpful.
My advisor recently purchased a Floating Network License and I have been trying to use the cluster computing node for sending jobs to my university cluster. However, every time I compute (send the job to the supercomputer) using the settings described above, COMSOL gives me an error message saying that “the server lost connection to the SSH key”. I followed all the steps described in the post but I’m wondering if there are some specifications I’m missing in the key? Or do I have to copy the key into some folders on both the local and remote supercomputer?
Thank you in advance.
Best Regards,
Barnabas Adeyemi.
Lars Dammann
June 8, 2020 COMSOL EmployeeHi Barnabas, thanks for the feedback! It sounds like password-less login is not correctly set up for your cluster. Make sure you can connect to your cluster using PuTTY without entering a password. You will have to perform some additional steps to make the server accepts your key, though. This is not described in this tutorial. I suggest that you google “putty passwordless login” or something similar and follow one of the tutorials you find.
Please note that the private key file acts as your password and you should treat it with the appropriate care. In particular, you should not copy it to shared drives or other insecure locations. The key file is not needed on the cluster, only on your local machine where you use COMSOL Multiphysics.
Best regards,
Lars
Barnabas Adeyemi
June 26, 2020Hi Lars,
Thanks so much for your response. I was able to get the keys working, using the online tutorials. Now, everything is set up and ready, using the settings discussed above. However, when I click compute, the status just remains on ‘scheduling’ and never really gets submitted. So I was wondering if this could be because I’m sending the job from a COMSOL 5.5 to a remote cluster that only has COMSOL 5.4? Or is there any other thing I’m missing out?
Thank you.
Best Regards,
Barnabas Adeyemi.
Lars Dammann
June 29, 2020 COMSOL EmployeeHi Barnabas, to solve a model created in COMSOL 5.5, the cluster will need to also run COMSOL 5.5 or higher. It is possible, that the problem you are seeing is caused by the lower version on the cluster. If you cannot resolve the issue with this information, please contact us at support@comsol.com and we will take a more detailed look.
Ibrahim
March 10, 2023Hi Lars,
Thank you so much for the explanation. Does the cluster computing comes with a separate module or just the multiphysics license is sufficient. I cannot find the option to show the cluster computing in the advanced study options. Could you please let me know.
Thanks in advance,